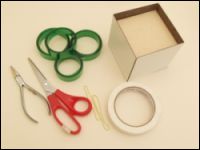
1. You will need scissors, flat pliers
and adhesive tape. You will also need a cubic mold (10 cm sides), with
the top part open, which can be made out of wood or a synthetic similar
material. Finally, you will need 4 PET bottles, each entirely cut in a
ribbon 2 cm wide. It is ideal that the mold's walls are thin, or at
least that its top part has thin walls (which can be obtained by using
wooden sheet to coat the mold).
|
2. Take one PET ribbon and cut from it a
segment sufficient to skirt three sides of the box (two sides plus the
bottom) 8 cm (this is in order to leave 4 cm for finishing each tip of
the ribbon).
|
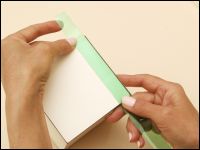
3. Measure 4 cm on one of the
extremities of the ribbon and fold it transversally at that point. Hang
the ribbon to the edge of the open part of the mold so that the longer
part of the ribbon hangs outside the mold. Then stretch the ribbon
across the mold, along two sides and the bottom of the mold. Make
wrinkles in the ribbon in order to mark the edges of the mold. When you
finish covering the mold's sides, fold the remaining portion of the
ribbon toward the inside of the mold.
|
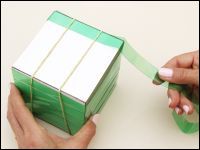
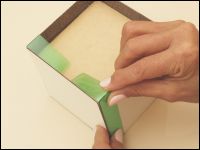
7. Notice that, at the bottom of the
box, the ribbons yet to be fixed will meet the ones already fixed
(warp). At that point, you will have to make some weaving. Take one
ribbon, wrinkle its first 4 cm and hang it to the edge of the mold.
Stretch the ribbon across one side of the mold. Wrinkle the ribbon at
the point where it meets the bottom edge of the mold. Then pass it
under the first ribbon of the warp, then over the second ribbon of the
warp and so on, until you reach the last fixed ribbon. Then cover one
more side of the mold with the ribbon and fold the remaining part of
the ribbon toward the inside of the mold.
|
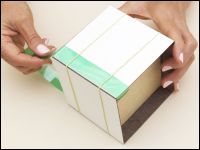
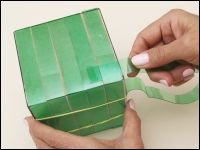
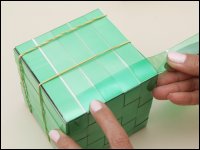
8. For the next ribbon, follow the same
procedure described in step 7, but, now, pass the ribbon in an inverted
pattern: where the first ribbon was passed under the fixed ribbon, you
shall pass the new ribbon over the fixed ribbon. Do the same with the
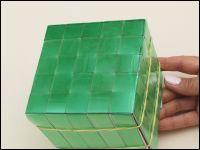
other ribbons. After that, you will start making the sides of the box.
For that, cut five PET ribbons long enough to coat four sides of the
mold plus 10 cm (for finishing). |
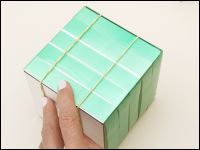
 9.You will start weaving
from lower to the upper part of the mold. Take one ribbon. It will have
to be woven in a pattern opposite to that of the pattern used for the
bottom ribbon just adjacent (and parallel) to it. Start weaving from
right to left and stop when you reach the end of the firs side of the
mold. Now you will have to adjust the positioning of the ribbon, since
its weaving must have a specific starting point. This starting point
has to be the first position in which the new ribbon stays over the
fixed ribbon. To set that point, use the parallel ribbon at the bottom
as a guide. After setting the starting point, take the free extremity
of the ribbon and weave with it from left to right. 9.You will start weaving
from lower to the upper part of the mold. Take one ribbon. It will have
to be woven in a pattern opposite to that of the pattern used for the
bottom ribbon just adjacent (and parallel) to it. Start weaving from
right to left and stop when you reach the end of the firs side of the
mold. Now you will have to adjust the positioning of the ribbon, since
its weaving must have a specific starting point. This starting point
has to be the first position in which the new ribbon stays over the
fixed ribbon. To set that point, use the parallel ribbon at the bottom
as a guide. After setting the starting point, take the free extremity
of the ribbon and weave with it from left to right. |